


Log Cabin 101 – back to school blog hop September 11, 2015
I’m today’s stop on Sam Hunter‘s wonderful Back to School Blog Hop, which is covering all kinds of sewing and quilting techniques and ideas, and I’d love to share some quick tips for sewing log cabin blocks! They’re one of my all-time favorite patterns – easy, quick, graphic, endlessly customizable, perfect for using up scraps, and beautifully simple. No angles, no complicated piecing, just beginner-friendly straight-line sewing and you’re on your way.

I was lucky to write a whole book of log cabin quilts and patchwork projects, Modern Log Cabin Quilting, four years ago, and Barnes & Noble recently published a brand-new edition with cover flaps and some other bells and whistles for just $9.98! My cousin, Alexis Hartman, illustrated it beautifully, and I’d love to share some of her super-clear diagrams today to get you started on your first (or hundred and first) log cabin block.
Log cabin always starts with a center square – though really, it could be rectangular or wonky or anything you like – with strips of fabric, or “logs” pieced around it, one by one. Traditional log cabin blocks use a smaller center square (often red or yellow, to symbolize the hearth or the light in the home), while some modern blocks expand the center proportions to be more of a major design element. Here you can see my center is slightly larger – not huge, but big enough to catch your eye in the design, and spotlight a print or element you might like best.
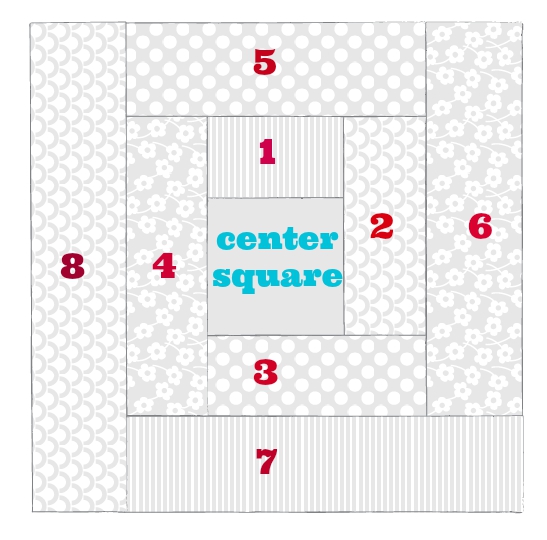 I like to piece my log cabin blocks clockwise. You are certainly free to piece in either direction, but when I show you the back of this block in a minute I’ll explain a bit more about why I like what I like! So, for this block, I add my log 1 above the center, using a 1/4″ seam allowance, and trimming the ends of the strip flush and finger-pressing as I go (what my PMQG friend Heather calls “snip & flip”). MLCQ has detailed diagrams of how to add the logs one by one, so please refer to that for more specific step-by-step instructions, but here you can see that moving clockwise around the block, you add log 2 to both the center square and the end of log 1. Rotate your block a quarter-turn and add log 3 the same way, then log 4. You’ve finished your first tier of logs, a mini-block in itself! At this point, I like to press my block back and then front with a steam iron, and trim any uneven areas neat and straight.
To continue, add log 5 to the side with the shortest log (1), and continue working in the same direction to add logs 6, 7, & 8. When you’re happy with the size of your block, press it back and front and trim it square with a quilting ruler and rotary cutter. Here’s a quick look at the back, which I always think is helpful to see.
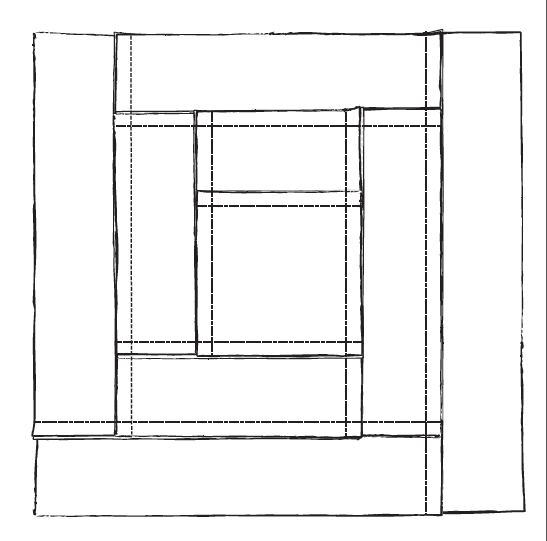 As you can see above, when piecing clockwise, your seams naturally align outward, away from the center, so finger-pressing or ironing them is very easy – just smooth out from the central square and they’ll lie flat and neat. If you piece counter-clockwise, you’ll find your seams naturally aligning inward, over the center square – and I find that a lot tighter and harder to press. So it’s really up to you which direction you choose to piece – just be consistent in your method and your block will look awesome!
You’ve learned the basics of building the block, so now it’s time for the fun part – choosing the colors, prints, proportions, arrangements, and settings that make your patchwork yours. I could go on and on about this because it’s so much fun, but I was so lucky to teach a series of four of my favorite log cabin quilting projects with Creativebug, and I’d love to share a bit more from that here – this little trailer captures so much of what I love about log cabin and really every kind of quilting, from choosing fabrics to planning your design and piecing it into a beautiful whole.
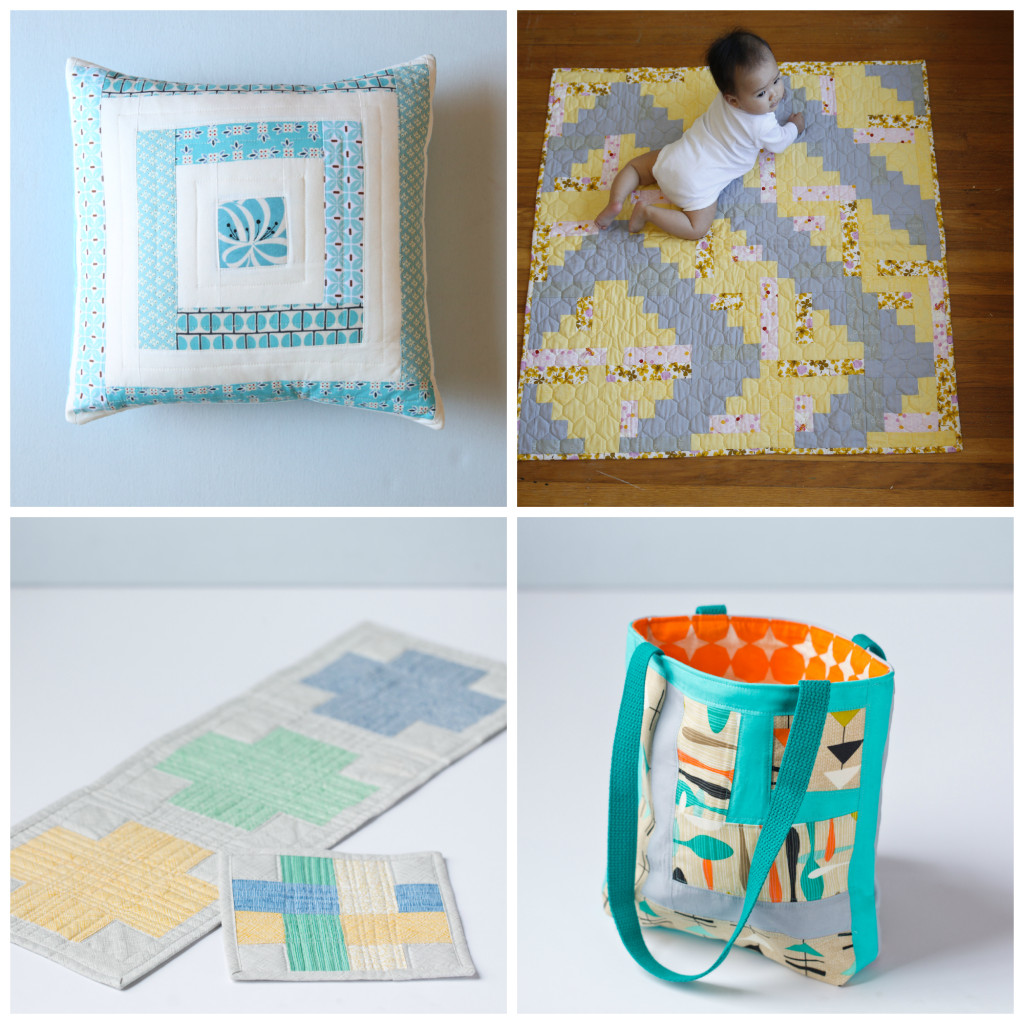
Here are four class projects I teach with Creativebug that show just some of the range you can achieve – a simple oversized center square pillow alternating solids and prints, a traditional-turned modern baby quilt with pops of color mixed into the “light and dark” configurations in a Barn Raising setting, a jelly-roll-friendly Modern Crosses (yes, those crosses are made of mini log cabin blocks) table runner or wall quilt, and a truly one-of-a-kind wonky quartered-log cabin tote bag… no two are ever alike! You can take any of these in your own direction following my templates and make your own beautiful projects your own.
If you’d like to take a deeper dive into designing and piecing blocks your way, I’d love to have you try my Log Cabin Quilting classes! Creativebug is offering an amazing special – if you sign up for their monthly subscription, which offers unlimited access to more than 500 classes, the first 2 weeks are absolutely free, no strings attached. I subscribed to to Creativebug for years before I taught with them and I love the range of craft classes they offer! The subscription is just $4.95 a month after the free trial, and they add new classes every week. It’s a really great deal and endlessly inspiring – lots of sewing and quilting classes in there with more on the horizon.
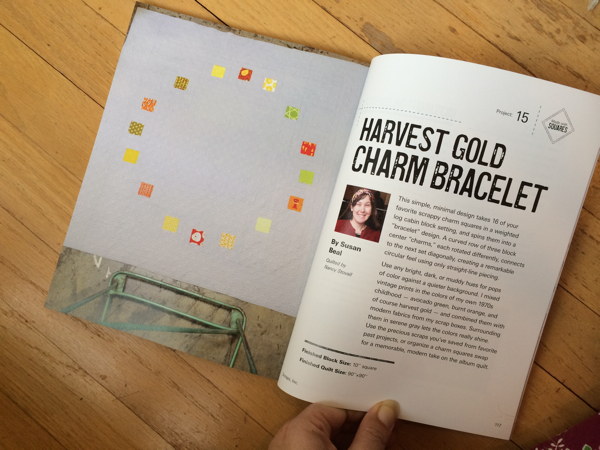
If you’re in Portland, I’m very excited that I’m showing two of my log cabin quilts at the NW Quilting Expo as part of the Portland Modern Quilt Guild special exhibit this month! My Barn Raising Baby Quilt (above) and my Harvest Gold Charm Bracelet from Scraps, Inc (below) will be hanging with almost 50 of my guildmates’ quilts. Yes, this “bracelet” pattern is all log cabin blocks with oversized charm square centers, weighted and rotated to give the illusion of a curve with all straight-line piecing. It’s one of my favorites and I’m so thrilled that it will be part of this beautiful show!
NW Quilting Expo is September 24, 25, & 26 and I’ll be there signing copies of Hand-Stitched Home and Modern Log Cabin Quilting – please come say hi if you have any log cabin questions and I’d love to chat about it then. I’ll have times and specifics soon and will update the post then, and share on Instagram too.
The Back to School Blog hop kicked off on September 1 and runs through the entire month, and a little of October too as there’s just so much great info to share! Hop along with some of our industry’s pros to get tips and tricks for your quilting and sewing studio.
Sept 1: Peta Minerof-Bartos of PetaQuilts – So, Does that Diagonal Method for a Pieced Backing Really Work
Sept 2: Cheryl Sleboda of Muppin.com – The Quilter’s Knot
Sept 3: Teresa Coates of Crinkle Dreams – The Importance of Pressing
Sept 4: Cath Hall of Wombat Quilts – Color Coding for Paper-piecing
Sept 5: Sam Hunter of Hunter’s Design Studio – How to Calculate and Cut Bias Binding
Sept 6: Melanie McNeil of Catbird Quilt Studio – Credit where Credit is Due
Sept 7: Mandy Leins of Mandalei Quilts – How to Keep a Perfect 1/4” Seam Between Different Machines
Sept 8: Rose Hughes of Rose Hughes – Fast Pieced Applique
Sept 9: Megan Dougherty of The Bitchy Stitcher – The Care and Feeding of the Domestic Sewing Machine
Sept 10: Lynn Krawczyk of Smudged Design Studio – Make a Mobile Art Kit
Sept 11: Susan Beal of West Coast Crafty – Log Cabin 101
Sept 12: Sarah Lawson of Sew Sweetness – Zipper Tips
Sept 13: Jane Victoria of Jolly and Delilah – Matching Seams
Sept 14: Jemelia Hilfiger of JemJam – Garment Making Tips and Tricks
Sept 15: Ebony Love of LoveBug Studios – Curved Piecing Without Pins
Sept 16: Misty Cole of Daily Design Wall – Types of Basting
Sept 17: Kim Lapacek of Persimon Dreams – Setting your Seams
Sept 18: Christina Cameli of A Few Scraps – Joining Quilted Pieces by Machine
Sept 19: Bill Volckening of WonkyWorld – The Importance of Labels
Sept 20: Jessica Darling of Jessica Darling – How to Make a Quilt Back
Sept 21: Debbie Kleve Birkebile of Mountain Trail Quilt Treasures – Perfectly Sized No-Wave Quilt Borders
Sept 22: Heather Kinion of Heather K is a Quilter – Baby Quilts for Baby Steps
Sept 23: Michelle Freedman of Design Camp PDX – TNT: Thread, Needle, Tension
Sept 24: Kathy Mathews of Chicago Now Quilting Sewing Creation – Button Holes
Sept 25: Jane Shallala Davidson of Quilt Jane – Corner Triangle Methods
Sept 27: Cristy Fincher of Purple Daisies Quilting – The Power of Glue Basting
Sept 28: Catherine Redford of Catherine Redford – Change the Needle!
Sept 29: Amalia Teresa Parra Morusiewicz of Fun From A to Z – French Knots, – ooh la la!
Sept 30: Victoria Findlay Wolfe of Victoria Findlay Wolfe Quilts – How to Align Your Fabrics for Dog Ears
October 1: Tracy Mooney of 3LittleBrds – Teaching Kiddos to Sew on a Sewing Machine
October 2: Trish Frankland, guest posting on Persimon Dreams – The Straight Stitch Throat Plate
October 3: Flaun Cline of I Plead Quilty – Lining Strips Up
Leave your comment to Cancel Reply