


crafty (button) tree trimmings November 30, 2009
I’m so pleased to be one of the contributors to a fantastic new holiday ornament e-book, Crafty Tree Trimmings!
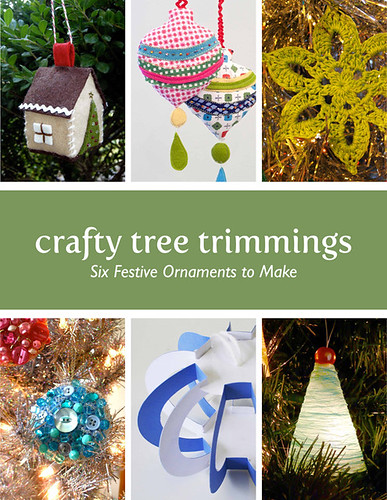
You can find it right here through December 31st, so be sure to order soon if you like it. The book is an instant PDF download with printable pages that includes directions and templates for making six pretty holiday ornaments, and 15% of all sales go directly to Project Linus. I designed a set of Bead and Button Sparkle Ornaments, which were a lot of fun to make.

You could do your own version with all buttons, or in any colors of your choice… this is a super adaptable project you can take in any direction. I mixed vintage beads, rhinestones, and buttons in a simple configuration, but I think this ornament would be darling covered with tiny antique pearl buttons… or with an ultra-symmetrical arrangement of larger and smaller buttons for a sleeker look.

Diane Gilleland and Patricia Zapata are the dynamic publishing duo behind the book, and the other contributors include Betz White, Linda Permann, and Kayte Terry. We each chose a fellow crafter’s ornament to make for fun this month, and I got to make Diane’s lovely Gossamer Thread Trees!
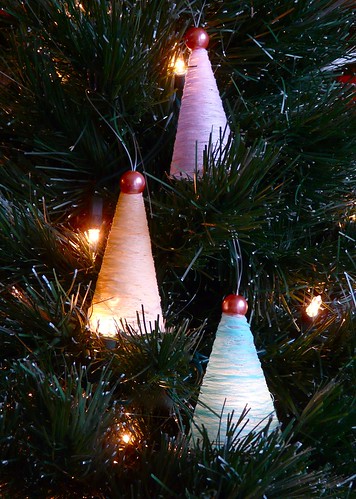
I made them as mantel decorations instead of hanging ornaments (lots more on that here), and added tiny button-star toppers to each one using some of my favorite things: glitter, felt, and vintage pearl buttons.

Here’s how to make your own star toppers to ornament these gossamer thread trees, if you’d like to try making a set too! You’ll need a small remnant of felt, scissors, glitter or Sparkle Mod Podge, two pearl buttons, a toothpick, and a hot glue gun for each star.
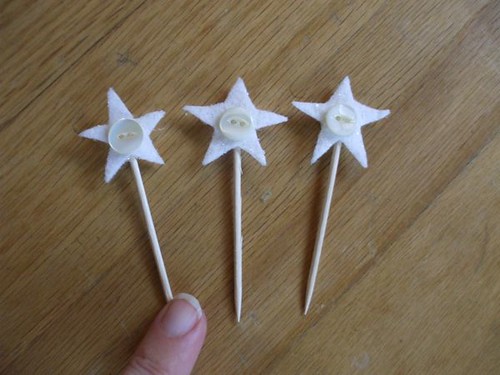
1. Follow Diane’s instructions on pages 15-18 of Crafty Tree Trimmings to make your gossamer trees. At step 7, when your first layer of wrapped thread is drying, cut one star out of felt for each tree. I cut mine freehand out of plain white craft felt — they were each about an inch across — but you can use a template or pattern if you’d rather.
2. Dip each star into the bowl of fabric stiffener you’ve been using for the thread so that they’re soaked through. Set them on acetate or another resistant surface they won’t stick to to dry.
3. When they’ve dried completely, brush on a coat of Sparkle Mod Podge (or sprinkle glitter on them while they’re still wet) to add a glittery effect.
4. Use a generous dab of hot glue to attach a toothpick to the back of each star. While that is cooling, add a pearl button to the front of each star with hot glue, then turn it over and add the second button over the toothpick on the back. Using a button on each side will make the topper balance nicely — it may tip forward if you only use a button on the front.
5. When you’ve finished making the tree (step 10), set one star onto the top of each cone. They should sit nicely and the toothpick will be completely hidden within the body of the tree.
6. Set the trees out on your mantel or a tabletop, or any other place you’d like to decorate for holidays!
I’ll be back tomorrow with more button holiday ornament and decorating ideas! I’m hoping to post every day this week — holiday crafting is one of my favorite things and of course any excuse to make things with buttons is a good one as far as I’m concerned…
Leave your comment to Cancel Reply