


wedding ring pendant re-do March 18, 2008
Desperation crafting struck this morning: at eight months along, it’s finally time to admit that my wedding ring has gotten too tight to wear comfortably. But I just couldn’t stand the thought of not wearing it, since I love it so much — it was my grandmother’s from her wedding in 1943, and it’s very precious to me. So I made it into this little temporary pendant with a single pearl dangling in the center. I can’t wait to slip it right back onto my ring finger, but until then I’ll be wearing it around my neck!
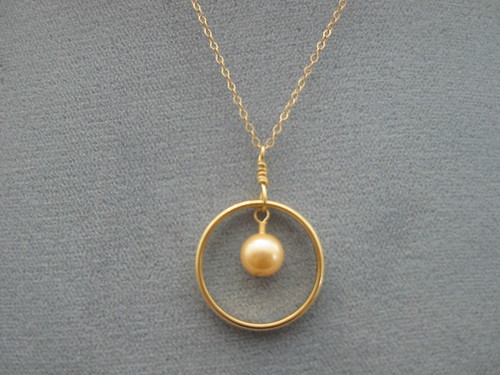
If you have a similar band ring or open circle that you want to remake into a simple pendant, here’s how I made this one:
You’ll need:
Pliers (flat-nose, round-nose and wire clippers)
Ring
One center bead (I used a 6mm pearl)
4 inches of 24 gauge gold-filled wire
1 gold headpin
Chain
1. Slip the bead onto the headpin and form a wrapped loop above it to create a simple dangle. Clip the end of the wire neatly.
2. Form a medium-sized loop that will be the first (lower) half of a double-wrapped loop using the piece of wire (ie: one lower loop catching the ring/pendant, one upper loop catching the chain, as in the photo), but do not start wrapping the coil yet. Slip first the ring and then the bead dangle onto the open loop so that the bead hangs neatly inside the ring or circle. Once those are in place, complete the wrap, winding the wire into a neat coil above the loop.
3. Now form a second wrapped loop above the first one, slipping your chain into the open loop before completing the wrap. Finish your pendant by coiling the wire around two or three times, until it meets the first wrap in the middle of the coil, and clip both ends at the back. Use your flat-nose pliers to flatten any edges that poke out.
Note: you can use wirework instructions and illustrations from any beading book to learn how to make the pearl dangle and double-wrapped loop. They’re on page 21 and 23 of Bead Simple, and I’ll be posting short technique videos for both (plus a dozen others) later this week, too — I’ll come back and post links then! Until then, I hope the text instructions make sense… looking at the photo can help you see the process, too.
Leave your comment to Cancel Reply